The floor of a garden shed is one of the most important parts of the building. It provides structural stability. If it’s damaged, it can be a safety hazard. You’ll want to repair a damaged floor as soon as possible.
Fixing a garden shed floor is straightforward. The time and effort will depend on what caused the flooring issues to begin with. You need to understand the problem, gather the supplies and tools, demo problem pieces, prepare the ground, lay the beams, and finally lay the floor and finish everything off.
Fixing a shed floor is more challenging than it may seem. Though there are several materials that you can use for the floor and foundation of a shed, I’m covering a standard wooden floor. You’ll need some carpentry skills, and you may need to buy a few extra materials.
The best time to fix a garden shed floor is before there’s a problem. If you notice a soft spot, it’s best to reinforce beneath or completely replace the flooring so that no one or nothing falls through. If there are holes or cracks in the flooring or gaps between the boards, it’s time to repair them before they get any bigger.
The wood may have rotted or become discolored. This can lead to further rot from the ground and open the door for pests, such as insects, mold, and fungus. A weakened floor can also make the flooring extra dangerous to step on, especially for heavier people or heavy equipment.
The wood may be warped and won’t stay level anymore or hold nails. That can make the floor uneven – a trip hazard. If the nails get loose and poke out of the flooring, that is an injury waiting to happen.
What Equipment Should You Have Available?
This list is fundamental. There may be other supplies and tools that you’ll have to find, borrow, or purchase. From what I’ve seen, though, these can handle most flooring repairs.
Bubble Level
Tape Measure
Circular Saw or Table Saw
Electric screwdriver
Wood screws of the appropriate size
or Hammer and Tack Nails of the proper size
Shims
2×6 beams
2×4 beams
Plywood (1/2 – 3/4 inch thick), and if you want even better protection from the elements, go with marine plywood or plywood with a water-resistant coating.
Orbital Sander
What Are the Steps for Fixing a Garden Shed Floor?
1. Demo the old stuff
Once you’ve prepped the shed and know where hidden wiring and plumbing are, you can move on. Remove the old floor. Be sure to remove all the debris from your area, so it doesn’t get in the way. If you can keep the beams you already have, remove any nails or screws. If you have to replace the beams, remove the nails and screws and take the older boards out.
2. Prepare the ground
Look at the base of your shed first. If the ground underneath has sunk or moved over time, you may need to shore up your actual structure before fixing the floor. Suppose you see evidence of standing water or a drainage issue. In that case, you should figure out a way of draining the ground around the structure. And talking about that moisture and possible rot, fungus, mold, and insect problems, it may be a good idea to add a new vapor barrier.
3. Lay the beams
Measure the distance across the shed from the inside edge of a one-floor joist to the inside edge of the next joist. Measure the distance from the bottom edge of a joist to the floor.
Cut a piece of pressure-treated 2 x 6 lumber to fit between two joists with a saw. Then, cut a notch in one end of each board, so it fits neatly over the rim joist.
Slide the board into position, keeping it tight against the existing floorboards and level across its length. Once you know its level, drive 1-1/2″ deck screws through the face of each joist and into each side of each new support board to hold them in place. Repeat this process with additional boards until all spaces are filled in.
Cut a 12-inch piece from a 2 x 4 and nail it to each end of the newly braced joists with 10d nails, making sure it is square with a framing square. This will provide extra support.
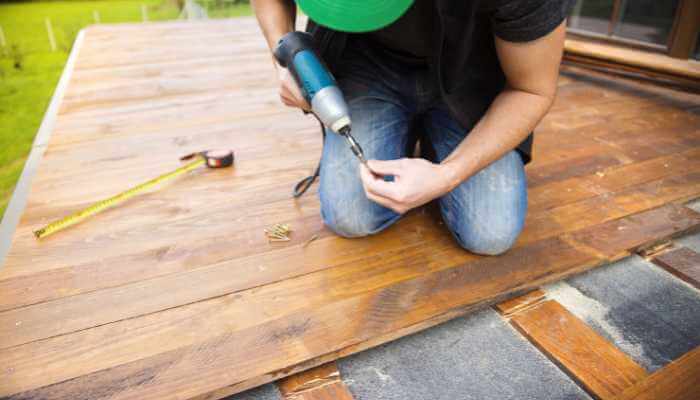
4. Lay the floor
Measure and cut your new plywood flooring to fit the size of your shed’s interior. Attach the plywood with galvanized nails or screws. Use an orbital sander to smooth out any imperfections in your new shed floor before staining or painting it. If installing a pre-finished wood floor, you simply lay it down over the base floor – per the manufacturer’s instructions.
What to Keep in Mind When Repairing Your Garden Shed’s Floor
While working on your shed’s floor, why not inspect your walls and roof? Check for any cracks or holes in your shed’s walls, ceiling, or roof and repair them as soon as possible. Without repairs, snow and rainwater will get inside and cause more damage to that brand-new floor.
This project will require heavy lifting and tools, but the results will be worth it!
"Growing up a country-girl means you enjoy the outdoors as much as possible, and no matter where you go in life, the outdoors is always part of you. I began doing research on things I wanted to do to make my outdoor space my own, no matter where we moved. And that research led me to write this blog to share with you!"

")
")
")
")

")
")