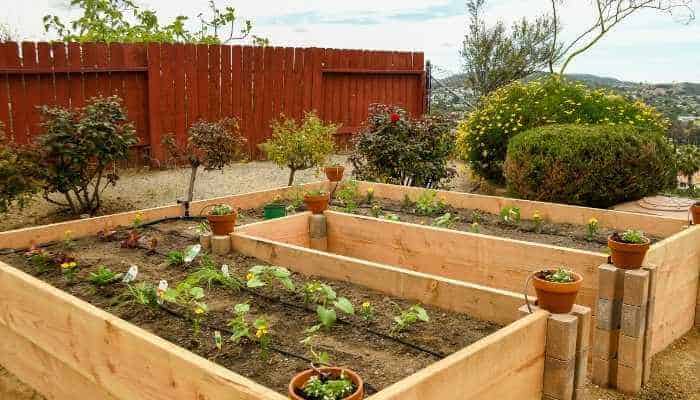
If using raised garden beds is the right choice for your gardening style, you may have some questions. Even if you’ve done your research, things come up.
If you do the proper planning and maintenance, your raised bed gardens will give you a great return on your investment of money and time. In this article, I’ll answer some important questions about both planning and maintenance.
You should always keep in mind the amount of sunlight needed for your vegetables. Most vegetables thrive in 6-8 hours of sun daily. So before you choose a spot, be sure there is plenty of sunlight. You also want to be sure they are near a hose because you’ll need to water these during the growing season.
Don’t place beds where there’s too much water or your soil is always damp. You’ll wind up giving your vegetable root rot and they’ll not produce well for you at all. You really don’t have to worry about the soil you place it on being anything other than dry because you’re going to be using a soil mixture in the bed itself.
How Do I Prep the Ground Before Placing a Raised Garden Bed?
Even though you could just place the raised garden bed over grass, it’s best to clear things out. You’ll need to remove the grass and weeds from the ground where you plan on placing your raised garden bed. The methodology for this depends upon how much time you actually have before planting.
If you have time to properly plan, you can use the soil solarization method to help kill off unwanted grass and weeds before placing your garden. Remove the thicker grass and weeds. Then, using a sheeting material (old carpeting, burlap, or clear plastic) cover that space.
If you can get carpeting that doesn’t have chemical residue, that is best because it’s permeable. The material should let rain in as well as heat up thanks to the sun’s rays. But so long as you can dampen the soil around the material, you should be good.
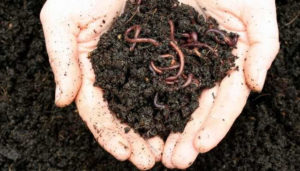
Soil solarization will kill off the weeds, seeds, and pests in your upper layers of soil while earthworms dig deeper and beneficial organisms either survive or recolonize quickly after. If you don’t have time for soil solarization, just do your best to remove as many of the weeds as possible from the area you want to use for your raised garden beds.
If you plan to use the bed for deep growing vegetables and it isn’t very tall, you may need to consider tilling and adding soil and nutrients to the ground beneath. Using a pitchfork or garden hoe, loosen your native dirt down to a 6-inch (15 cm) level at least. Add and mix in some of the soil you will be using from your bed to encourage further growth. In this case, you won’t be adding a base material, so be prepared to be extra diligent in weeding.
What Should I Have in the Layers of My Raised Garden Bed?
Well, first off you need to choose a base material for your raised garden beds. Other than the deeper growing bed that uses some of the ground beneath, all of your raised beds need a base material. That material needs to be natural, able to drain well, and be a deterrent to weeds.
Next, there needs to be a composting layer. This layer can be small twigs and old branches or just dead leaves and straw. I wouldn’t use old grass clippings or hay, because that could introduce seeds that could germinate. These things need to be at least 4-inches (10cm) thick. As they decompose, they’ll add richness into your soil, and also the thicker the layer the more of a weed deterrent you have.
The next layer should be inexpensive soil. What do I mean by that? Maybe some old potting soil mixed with some native dirt? Maybe the cheapest soil you can find that can cover and be mixed a bit with the composting materials beneath. This layer should be around 4 to 6 inches (10 – 15cm).
The last layer should be 7 to12 inches (18-30cm) of very good quality soil. You can fill your bed to the top or leave an inch of space below the top of the bed. I used a mixture of local compost with quality topsoil for my own and it worked well. I wrote an article about soil mixtures, just in case you need it.
If you have shallow beds, you can definitely bypass the inexpensive soil layer and use only high-quality soil or a high-quality mixture. Also, you’d want to half the composting layer and it should just be leaves and/or straw since twigs and wood might overload the bed.
Optionally, you can add a final layer of straw or mulch to help further with weed control and keeping moisture wicked into your plants.
How Often Should I Water Raised Vegetable Garden?
The watering schedule for your raised garden bed depends upon your climate and also the season and the weather your area is experiencing. If you have windy, dry, or hot weather, you may need to water your gardens daily. Otherwise, the raised beds may only need watering twice a week.
There are ways to figure out what a plant needs. Is the soil dry? Do your plants have yellow leaves? Are your plants growing too slowly? Are the underleaves becoming brown? Well, those are signs of under-watering.
But keep in mind that too much watering will suffocate the roots. Is the soil always wet? Is the new growth falling off of the plant? Does your plant smell foul? Are leaves falling off a yellow or brown color? Because those are signs of over-watering.
Watering your plants in the morning can be more effective. In the morning, plants absorb water quicker. Because the plants use that water during the day, this won’t leave the soil too damp overnight. When you water in the morning, more water is used rather than evaporated.
If you have the money, you could opt for an automatic watering system. That means you decide which type of watering system will work best for your raised garden beds and install them. If it’s on a timer, it should be able to keep your plants watered consistently, even if you’re not available.
You need to make sure to pull out all weeds, dead plant material, and sick plants. You don’t leave the plant material itself in there because that might cause an infestation or disease to pop up next planting season. You also need to clean up any rotting or damaged portions of the bed itself.
Next, you need to aerate the soil on top and refill the bed with more soil and potting mix. Usually, you lose some soil volume due to settling and plant removal over the growing seasons. Then, add a layer of compostable material. Some people just use vegetable scraps, dead leaves, or mulch. I’ve seen good results with using a bit of cow or chicken manure or even composted manure layered on top of those things to hasten decomposition and add nitrogen. And worms love this stuff.
Your last step to winterizing is protection. You want to protect the soil from hard freezes and from weeds. Therefore, you need to find a good material that will hold in the heat and keep the sunlight from filtering into the soil (old carpet, cardboard, landscape fabric, plastic). Once the compost is covered like this it should kill off all weeds and most harmful fungi and microbes that usually remain on the surface.
How Do I Make Raised Rows in a Raised Garden Bed?
You won’t find this very often, because the point of having rows in ANY garden is to drain off moisture. A raised garden bed is made with the idea that everything will drain down through the layers. Another reason for rows is to have a walking path between plants in a garden you can use for gathering your crops and working with the crops and weeding. None of that applies to raised garden beds. These beds are made for the convenience of simply leaning over and reaching in to do that kind of work.
What I have found is that some raised garden enthusiasts like using rows to keep their seedlings in order for thinning and especially for the cultivation of microgreens. If you’re going to make rows in smaller raised beds, you may want to just use your hand tool, to begin with.
In some larger raised gardens, I’ve seen people use wood cut to the width of their bed to run between each row of plants to keep things neat and tidy. Wood stripped from old pallets can work. And where the wood sits, weeds are discouraged. I think this method is just ingenious.
If you don’t want to leave the wood, you can simply use one piece, cut to the width of the raised bed. On the narrow side, press the wood piece into the soil. It will leave a straight furrow for dropping seeds. Then, you can use the wood on its flat side to provide a gap of empty space. Lift it to the narrow side and press it down again to make another trough for seeding. If you do this from one end of a bed to the other end, your rows will be nice and straight.
Check out this video by Huw Richards for free gardening hacks:
How Do I Aerate Raised Garden Beds?
Aerating is simply the act of introducing air to the soil. So just taking a shovel, rake, or hand tool and gently turning the soil around the roots of your plants without harming the roots is aerating your raised garden bed.
Do you want to aerate only or fix compacted soil? You can do both at the same time and keep your plants healthier. Simply add fresh compost to the top of the bed before you then use a tool to aerate the soil. This means you’re introducing more air to the soil along with fresh nutrients.
In Conclusion
I hope I was able to answer a few questions for you concerning Raised Garden Beds. Most of these topics just didn’t have enough information about them for me to create an entire post for it on their own, and yet they are pretty important to people getting into raised bed gardens. Therefore, the questions definitely shouldn’t be overlooked.
"Growing up a country-girl means you enjoy the outdoors as much as possible, and no matter where you go in life, the outdoors is always part of you. I began doing research on things I wanted to do to make my outdoor space my own, no matter where we moved. And that research led me to write this blog to share with you!"
")
")


")
")
")
")